While some people are openly satisfied with their computer’s recording abilities, most search for something more. And my guess is that if you’re reading this, you fall in the latter category of individuals.
Now the aim here is to help you unravel all relevant information encompassing audio interfaces. This way, if you’re looking to get yourself one of these bad boys, you’ll know exactly what to go for. Without further ado, let’s get to it.
Table of Contents
Thunderbolt 2-3 & USB-C
Zoom TAC-2R
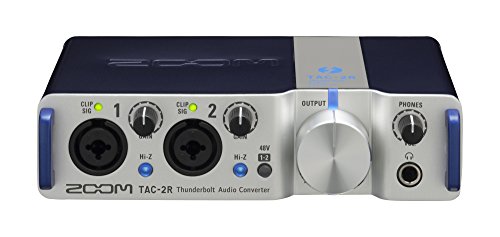
The TAC-2R is a bus-powered Thunderbolt audio interface. When latency matters to your recording you need an interface that can keep up, those of us who are used to using a lot of post-processing effects are all too familiar with when an interface just can’t keep up with the work. Low latency used to mean high priced, but Zoom has introduced the TAC-2R as a relatively affordable option in the space.
Thunderbolt connections are the future of audio recording. Lightning-fast with 10 Gbps data transfer speeds, close to zero latency and the ability to carry 10 watts/18 volts of power, Thunderbolt is far beyond the utility of USB and we’re seeing more and more professionals moving away from traditional USB based interfaces to embrace the extra speed that this connection offers.
Focusrite Clarett 2Pre
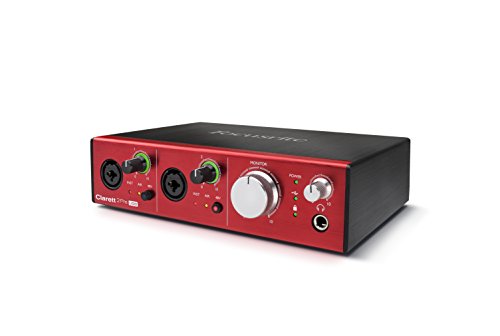
The Focusrite Clarett 2Pre is the smallest interface in the Clarett lineup, it offers bus power to those lucky enough to have a 15w power delivery capable USB type C port to connect it to. Clarett is Focusrite’s premium range of interface and as such it has the best preamps of any of their USB audio interfaces.
The preamps are really where the Clarett series shine, offering incredible quality and the much lusted after “Air” effect, which when used emulates the sound signature of Focusrite’s classic transformer-based preamps. When enabled, “Air” reproduces the input impedance, clarity and frequency response curve of those vintage mic preamps. which creates wonderfully distinguished analog quality to recordings made with the interface.
The Clarett 2Pre takes advantage of Thunderbolt technology to get near-zero latency when connected to a Thunderbolt-enabled port. More and more high-quality USB interfaces are embracing Thunderbolt to do things that regular USB connections never could. We’re really excited to see how far manufacturers are pushing this technology and what it’s bringing to the audio world.
Apogee ELEMENT 24
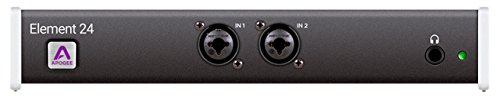
The Apogee Element 24 is a Thunderbolt audio interface aimed at producers in the Apple ecosystem.
This a thunderbolt interface, which for the uninitiated means that you can get almost zero latency when recording with it.
Unfortunately, even though we’re seeing a lot of Thunderbolt interfaces moving to USB bus-power these days, the Apogee Element 24 requires an external AC adapter – read more in Apogee Element 24 full review.
Universal Audio Arrow
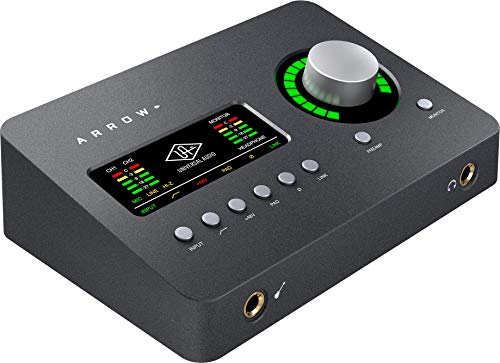
The Apollo audio interfaces are among the best of Universal Audio’s lineups. Their impressive selection of hardware emulation plugins makes them one of the biggest success stories in the music technology market.
But being externally powered means you’re not going to be able to mix and record whenever you’re on-the-go, but this has all changed thanks to the Arrow Thunderbolt 3 audio interface.
The Arrow is Universal Audio’s way of giving audio engineers a bus-powered and more compact version of the Apollo with none of the main plugs required. It is also more affordable than the cheapest of the Apollo line.
However, this means having to sacrifice a few things as you will get a considerably lesser amount of I/O with the Arrow along with no Quad DSP or Core Duo options. This shouldn’t be a problem though as the features and functionality of the Arrow aren’t affected in any way by these. See more under $500 interfaces.
PreSonus QUANTUM

When you first take it out of the box you will be greeted by a mammoth of an interface as PreSonus really went all out when they designed the Quantum.
Since 1995, PreSonus has built its reputation on producing some of the best audio interfaces in the semi-pro market, and the Quantum is no exception.
When viewed from the front it looks like an over-sized DVD/Blu-Ray player and needless to say it looks very impressive from an aesthetic standpoint.
4-Channel
Steinberg UR242
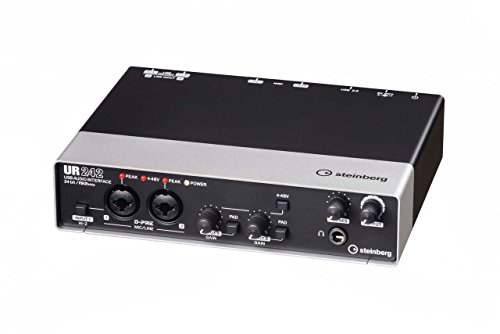
Upon first glance, there’s nothing really impressive about the UR242’s appearance because it looks similar to just about every other audio interface out there.
While its appearance is not going to win it any awards, but that doesn’t mean its design isn’t good.
The chassis is a simple black and grey giving it a clean, but minimalist look. Overall, the device has an old school look that can blend in well with any environment. It’s also durable and looks like it can survive a fair amount of abuse.
2-Channel
PreSonus AudioBox USB 96
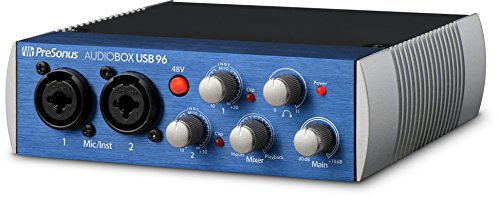
One of the first things you’ll notice about this audio interface is its size.
It is smaller than most of the other audio interfaces available in the market, and whether this is a good thing or not depends on the user’s personal preference.
Like most PreSonus interfaces the AudioBox 96 still features the same silver and blue aesthetic that most PreSonus users have become familiar with, and quite frankly it looks really nice. Check out more under $200 picks.
Focusrite Scarlett 2i2 (3rd Gen)
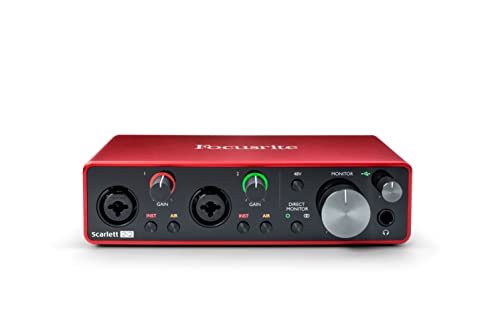
The Focusrite Scarlett 2i2 (full review) is the latest model in the popular series. We’re pleased to see that Focusrite has brought this interface right up to date with the addition of USB Type-C connectivity.
For anyone who doesn’t know, we’re pretty big fans of Type-C and all the benefits it brings to recording latency.
Focusrite has also upgraded the preamps in this model since its last iteration. We’re happy to see their dedication to continuously improving their products, rather than just slapping a USB Type-C connection on the old one and calling it a day.
M-Audio AIR 192|4

M-Audio AIR 192|4 offers you a simple easy-to-use audio interface. It comes in a well-designed, sturdy, and rigid case.
If you are all about aesthetics, you’ll be pleased with M-Audio AIR 192|4. It is neatly assembled on a sturdy aluminum plate with a glossy plastic cover inserted on top.
Though it is beautifully designed, the M-Audio AIR 192|4 remains well-balanced, always remains firmly fixed on the table. This due to its robust weight, rugged tabletop rubber legs, and sturdiness.
Number of Channels
Home-studios often function okay with 2-channel interfaces. This is because in most cases such scenarios involve recording one instrument at a time.
However, when it comes to heavy sonic agendas, such as recording multiple instruments all at once, four channels or more are best suited.
A professional musician would normally go for up to 18 channel interfaces due to the amount of sound intensity they deal with. However, if your sonic needs are less demanding, fewer channel interfaces will work just fine.
See 4-6 channel audio interfaces or we recommend.
Connectivity
Typically, there are multiple means through which you can hook your interface up to your computer.
Now deciding on what connection method to settle on might turn into a bit of a head-scratcher for most. The array of connection options is a mondo advantage; however, it can also very easily be a cause for confusion.
Lucky for you, we’re here to break such details down for you. Below is a brief overview of various connection options available; each with their strongholds highlighted. With that said, let’s do it.
USB
USB connections are more popular/ideal for mobile recording rigs (see portable mobile interfaces
that are smartphone compatible – iPhone and Android). More often than not, this kind of connection is rampant with cheaper models of home interfaces. They offer a rather slow data transfer rate. Essentially, they fall right at the very bottom of the connection hierarchy in this case.
Firewire
Next in this line up is the firewire cable connection option. These are definitely faster than their USB counterparts. They offer more consistency and more significantly, multi-channel recording.
The only downside is that these are primarily found on Mac computers; PC users need expansion cards for proper access.
Thunderbolt
In the recent past, this connection has become increasingly popular especially with Mac devices. Even so, some PCs come equipped with Thunderbolt option cards; so to all PC users, you still get something to work with.
As you might guess, these are incredibly faster. They also offer lower latency performance. They are more popular with semi-pro interfaces.
PCIe
For professional level interfaces, these are standard. Why? You guessed it, they come packed with incredible sonic power. Extremely fast data transfer rates, additional processing power, and very very low latency levels.
It also comes packed with the ability to handle many simultaneous inputs and outputs. Needless to say, audio interface connectivity doesn’t get any better than this in the current age.
Additionally…
Here’s the thing, when it comes to I/O, it is very possible to expand your input unit. With an ADAT connector, you can hook up an external multichannel mic preamp automatically expanding it.
Also, it is important to ensure your computer is compatible with the audio interface you settle one. This will help you dodge any unnecessary complications when its time to work.
What inputs and outputs (I/O) do I need?
The nature and number of inputs/outputs required strongly depends on your overall needs and interest.
Different recording needs call varying I/O requirements.
Basic functions such as video voice-overs need no more than a single input. Pro-level musicians and sound engineers, however, need more dedicated players, therefore anywhere between 16 to 20 inputs.
Fortunately, the market has a tremendous variety of audio interface models. Once you have a clear idea of just what you want, finding one that works great for you becomes a cinch.
Types of Input and Outputs
Because audio interfaces are used for distinct purposes, varying models come furnished with diverse types of inputs.
Let’s take a quick look at the most common kinds.
Mic-Level
These serve the basic function of connecting microphones on to the interfaces.
Line-Level
Designed to produce a much stronger signal than the mic level I/O, line-level inputs and outputs are used in the case of an additional outboard mic preamp. This is done to rev up weak mic signals for cleaner sonic produce.
Optical I/O
This is a digital panel where both an additional outboard mic preamp and digital converters are used as mic channels.
ADAT connectors
These are next level I/Os made to simultaneously handle up to 8 audio channels. For anyone nurturing any possible expansion prospects, this panel is a tremendously smart choice.
S/PDIF
These are engineered two-channel consumer formats. They either use coaxial phono or Toslink optical connectors.
Audio Interface Q&A
No feeling quite compares to when you finally get your hands on your ideal audio interface. You feel relief and joy. But most importantly, it feels like nothing stands between you and musical prowess, right?
In a sense, that’s very true. However, you must remember the purchase is hardly the last of it, you need to set up the interface. What most people don’t realize is that without the right set up, your audio interface may not work as sufficiently as you would want it to. It may not work at all.
Which is why we came up with this write up. Its meant as a sort of myth-buster on all matters regarding audio interface connections and set up to your computer. With that said, let’s get to it.
What is an audio interface?
To put it simply, an audio interface is a piece of hardware that connects audio format files to your computer.
It helps convert analog sound signals to digital signals (and vice versa) to enable processing by the computer.
In other words, it gets the desired sound in and out of the computer.
As you might have realized earlier, every computer does come with an internal kind of audio interface. Nevertheless, an additional external bolster will always take things a notch higher. Audio interfaces provide an array of input and output choices; they also clean up sound recordings pretty good to produce crackerjack results. Needless to say, this bad boy is a clever if not essential addition to any audio studio.
Why you may need an audio interface?
It’s pretty simple; want professional-level recording? Better connectivity? Reduced convulsion and noise in your audio output? Then you definitely need an audio interface.
The truth is, computer sound cards are standard type audio interfaces. Their performance is duly restricted and may not be ideal for anyone looking to do serious work.
What we have here is a gadget that brings you extra input slots, record monitoring capabilities, and better sound editing maneuvers.
It is important to note that additions such as XLR inputs, high Z phone plugs, and headphone/speaker jacks improve the recording process by a long shot.
In a nutshell, an audio interface makes it possible to not only record real instruments, but it also lets you play around with a vast variety of sound types. The best part is that its multiple track recording faculty makes it suitable for band recordings too.
What do you need to set up an audio interface?
Needless to say, it is imperative that you have all the pieces to the puzzle before you get started. If you’ve been through this process before, you know that you need more than just the interface to have your studio up and running.
Here’s a brief breakdown of the most essential stuff required.
Right interface
By this time, the assumption is that you already found that high-octane audio interface you wanted. However, it never hurts reaffirm your choice.
Ask yourself questions such as:
- Is it compatible with my computer?
- Does it have a sufficient number of inputs and outputs?
- What form of connectivity will I be required to use?
- Once you are positively confident in your pick, you can head on to the next stage.
Connectivity
This varies depending on the nature of your interface as well as the intensity of your intended works. There are various ways through which you can hook up the interface to your computer.
These include USB cables, Firewire, Thunderbolt, and PCIEs. Be sure to confirm what you pick works well with your computer.
It is also very important to mention that the quality of your tonal output strongly depends on your connection methods. Any additional connections such as preamplifiers should also be put into serious consideration.
Editing software and drives
Besides the hardware bit of the connection, you will need something intangible to secure the interface’s functionality on your computer. Interfaces will often come with software on purchase.
Fortunately, you can get an additional driver/software to rev up the performance. Nonetheless, your computer should meet the specifications required by the software.
How do I connect an audio interface to my computer?
The good news is that you hardly need to break any sweat when connecting your interface to the computer and instruments. The bad news is that not everyone is that lucky. You might find yourself struggling with the initial connection process.
But worry not, we have you covered.
1. Hook up the interface to your computer
So now that you have everything, its time to finally set up the interface to your computer. By use of the ideal connection cable, hook up the interface to your computer. Ensure a neat connection for the best results.
In some cases, you may need to replace your computer’s sound-card to mold its compatibility with the interface.
2. Editing software and drives
Besides the hardware bit of the connection, you will need something intangible to secure the interface’s functionality on your computer. Interfaces will often come with software on purchase.
Fortunately, you can get an additional driver/software to rev up the performance. Nonetheless, your computer should meet the specifications required by the software.
3. Connect your instruments
You can either connect this directly onto the interface or use another medium to do the same. For instance, preamps come between the interface and the instruments. Otherwise, the instruments would normally hook directly to the interface.
Once that is over your job pretty much done.
Is my computer sound card an audio interface?
Recording sound, even from the warmth of your home, requires quite a lot. Sure you have a computer; and yes, it can get the job easily done for you. But the major question here is; can it singlehandedly help you achieve that top-level sound that you’re after? No? I thought so. Luckily, that’s where audio interfaces come in.
Now don’t get me wrong, the computer built-in sound-card in itself is an audio interface of some sort. It is also very capable of processing sound meticulously. However, built-in sound-cards have proved to be rather inhibiting for anyone looking for that professional and refined output.
DAW Compatibility, Software and Drivers
Drivers and software enable an audio interface to communicate with the computer. Needless to say, they are essential to the whole process.
On purchase, audio interfaces will often come packed with their own software. But that doesn’t mean you’re limited to those, you can get more of your choice.
Digital Audio Workstations (DAW), on the other hand, could be physical or abstract. They come in the form of application software or an entirely separate electronic device. Now DAWs are very important; they help with the recording, editing, and producing audio files.
The good thing is that most DAWs will work just fine with your interface. However, they are a few cases of incompatibility. Worse still, DAW compatibility is not always guaranteed in the long run. Your DAW/interface combination may work now but maybe incompatible tomorrow. To avoid such instances, you can check for such information on the interface’s company website.
Your safest bet is to use a DAW/software package from the same company. Unfortunately, not many companies produce both.
Desktop vs Rack-mount Interface
Desktop interfaces are relatively small and will easily fit right onto your desk. They are often cheap and very user-friendly. Desktop interfaces are best for beginners due to their uncomplicated nature. Once you plug these babies in, you’re ready to go.
Rack-mount interfaces, on the other hand, are a bit more complex. These are engineered for pro-level recording tasks. They will often have 8 or more channels; they also have larger I/O panels. In terms of size, they are pretty large. Even so, they are more flexible and have much much better signal routing capabilities.
In short, if your recording needs are basic, a desktop interface will fit into your plans just right. However, for more complicated sonance manipulation needs, a rack-mount interface works best.
Latency
In the simplest terms, latency is an undeniable delay between actual sound during playback. In all honesty, high levels of latency are a bit of a nuisance and can get pretty frustrating.
Latency in today’s computers is not as bad as it once was. However, built-in computer sound-cards manifest this problem quite often. Luckily, we live in today’s age and there’s a scientific solution to nearly anything.
Audio interfaces are designed to minimize latency by a long shot. If you notice your computer has a latency problem, go on ahead and get yourself an audio interface.
Common brands
As you would expect, they are a few audio interfaces that shine rather bright in the market.
Some of the most common brands include Universal Audio, Avid, Apogee, M-Audio, Focusrite, and Presonus. The list goes on and on.
All I can say is that the decision lies in your preference and specific needs. Each of these brands has unique offers to its users. Nevertheless, you will have to do your homework to find what works for you.